
 One of the great benefits of working at Highland Hardware is one is constantly exposed to new woodworking techniques and skills. I became interested in woodturning after watching a co-worker turn a pen on his lunch break one day. The next day I tried
my
hand at it on
my
break, and I was hooked! Luckily, Christmas was right around the corner, so I asked for a
Jet Mini Lathe
(141582). Santa was kind enough to bring it, and soon I was turning all different kinds of pens. Turning a pen is an ideal introduction to woodturning. A pen is one of the easiest, yet most attractive items you can produce - you get virtually instant gratification.
One of the great benefits of working at Highland Hardware is one is constantly exposed to new woodworking techniques and skills. I became interested in woodturning after watching a co-worker turn a pen on his lunch break one day. The next day I tried
my
hand at it on
my
break, and I was hooked! Luckily, Christmas was right around the corner, so I asked for a
Jet Mini Lathe
(141582). Santa was kind enough to bring it, and soon I was turning all different kinds of pens. Turning a pen is an ideal introduction to woodturning. A pen is one of the easiest, yet most attractive items you can produce - you get virtually instant gratification.
Below I have tried to convey how simple it is to turn a pen. I have detailed the steps
I
take and the methods
I
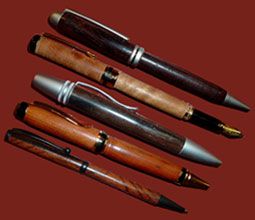
employ. However, as the saying goes, "There's more than one way to skin a cat". You will no doubt discover your own techniques, tips and tricks that will work best for you. Although you may want to start turning less complicated, traditionally-shaped pens until you become comfortable with the process, the shapes and styles you can create are limitless.
Another benefit of penturning is the abundance of materials available for your projects. You finally have a use for all those scraps of beautiful curly walnut and breathtaking birdseye maple you just couldn't bear to throw away! Materials such as acrylic, stabilized and/or dyed wood, deer antler, Corian and many others can also be used.
Materials needed:
 To begin, select a piece of wood the size specified in your pen kit or larger. The grain should run lengthwise down the pen, or the wood may break. A piece 5/8" square by 6" long is large enough for most pen styles. Fatter styles such as the Cigar pens, however, require pieces at least 3/4" square. Cut the wood blanks about 1/8" longer than the brass tubes from the pen kit. I like to mark the pieces before I cut them so I can later line up the grain properly.
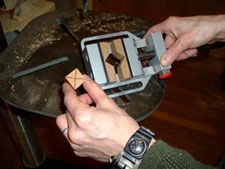 Mark the center on one end of each blank. A pen drilling vise will accurately center and hold your blank square during drilling, or you can use a regular drill vise or clamp to hold the wood, as long as you insure it is held at a right angle to the table. I outfitted my
mini drill press vise
with notched wooden pads to hold the blank square.
Mark the center on one end of each blank. A pen drilling vise will accurately center and hold your blank square during drilling, or you can use a regular drill vise or clamp to hold the wood, as long as you insure it is held at a right angle to the table. I outfitted my
mini drill press vise
with notched wooden pads to hold the blank square.
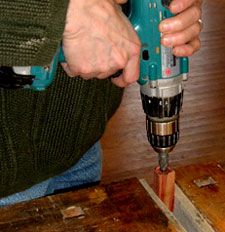
A hand drill can also be used, but I strongly recommend using a drill guide , or you're apt to drill at an angle and straight through the side of the blank! Even if you stay inside the blank, it's unlikely you'll drill straight down the center, which means you may not have enough wood left on all sides of the blank.
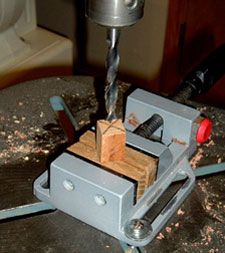 Using the appropriate size drill bit for the pen kit, drill a centered hole lengthwise through each blank. Use a relatively high speed and back the bit out every inch or so to clear the chips out. Otherwise the chips will become compacted, causing the bit to overheat and the wood to start smoking! The more resinous exotic woods tend to gum up, too, when overheated, so clean the chips off the wood very frequently or your drill bit will become glazed.
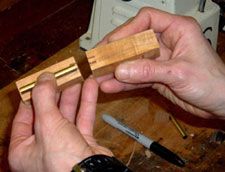
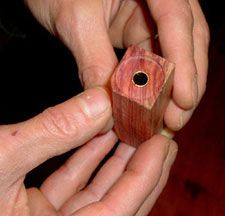
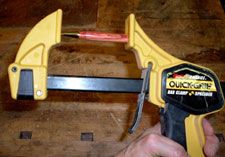
Once you've drilled both blanks, scuff up the outside of the brass tubes with coarse sandpaper, using a twisting motion, to give the glue a good surface to adhere to inside the wood blanks. Use quick-setting epoxy or thick CA (cyanoacrylate) glue to glue the tubes into the blanks. For best results, apply a bit of glue to the inside of the wood as well as the tube. Using a pen press, a plastic squeeze-type bar clamp with the pads removed, or a vise with wooden jaws, press the tube into the blank. Do not use a metal clamp or vise with unlined metal jaws, as you will crimp or bend the brass tubes. Also, DO NOT try to hammer the tubes in, as I guarantee you will bend them or damage the ends! Trust me - I've tried it! Push the tube in until the ends are slightly inside each end of the blank so you have enough room to trim the wood square. I've found that the pointed end of a pencil or a sharpened dowel works perfectly to recess the tube.
 After the glue has dried thoroughly, use a pen mill to square the blanks and remove any glue residue from the inside of the tubes. Trim the wood at both ends of the blank until it is just flush with the ends of the brass tube. Be sure not to trim too much off, as the tubes are precisely sized to match the pen parts. Alternately, a disc or belt sander can be used to trim the blanks, as long as the ends are properly squared.
 I usually trim the blank just until the end of the brass tube gets shiny.
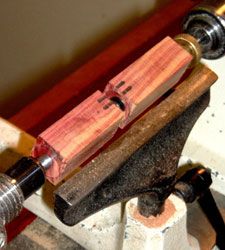 Once your pieces are squared, mount the bushings and wood blanks on the pen mandrel. Be sure to follow the instructions for the pen kit, as the bushings and blanks must be arranged in a specific order for the pen to assemble correctly. Each bushing corresponds to a particular pen part and provides the exact diameter to which the wood must be turned.
Once you have mounted and properly oriented the bushings and blanks, tighten the knurled nut on the mandrel. Don't overtighten it or the mandrel might not run true. Bring the tailstock up to the end of the mandrel, lock it down and then turn the point of the live center into the dimple in the end of the mandrel. Advance the live center just enough to maintain contact with the mandrel; again, don't apply too much pressure.
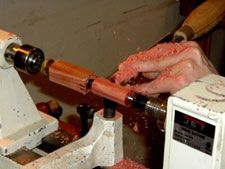 Now for the fun part! Turn the wood blanks down close to the bushing size. You can create various shapes and embellishments, however, be sure you
do not
turn the parts of the blank next to the bushings
smaller in diameter
than the bushings, or the pen parts will not fit properly. I like to leave the wood
very slightly
oversized and sand the pieces down to the final size. This way I have enough material to work my way through progressively finer grits of paper and achieve a super-smooth finish. I like the
Pen Turner's Abrasive Kit
, as it conveniently dispenses 150, 240, 320 & 400 grit sandpaper in 1" wide pieces that you can cut to your desired length. The paper is cloth-backed, too, so it doesn't rip or shred from high-speed lathe sanding.
Now for the fun part! Turn the wood blanks down close to the bushing size. You can create various shapes and embellishments, however, be sure you
do not
turn the parts of the blank next to the bushings
smaller in diameter
than the bushings, or the pen parts will not fit properly. I like to leave the wood
very slightly
oversized and sand the pieces down to the final size. This way I have enough material to work my way through progressively finer grits of paper and achieve a super-smooth finish. I like the
Pen Turner's Abrasive Kit
, as it conveniently dispenses 150, 240, 320 & 400 grit sandpaper in 1" wide pieces that you can cut to your desired length. The paper is cloth-backed, too, so it doesn't rip or shred from high-speed lathe sanding.
 There are a variety of finishes you can apply to your pen, ranging from wax to friction polish to lacquer to CA glue. It just depends on your preferred method of application and the finish you'd like to achieve. I, personally, prefer to apply my finish on the lathe. I usually use CA glue followed by a dab of
Renaissance Wax
. CA glue provides a hard, durable surface that fills the grain, and the wax gives the wood a nice feel and a sheen that can easily be restored by buffing with a soft cloth.
There are a variety of finishes you can apply to your pen, ranging from wax to friction polish to lacquer to CA glue. It just depends on your preferred method of application and the finish you'd like to achieve. I, personally, prefer to apply my finish on the lathe. I usually use CA glue followed by a dab of
Renaissance Wax
. CA glue provides a hard, durable surface that fills the grain, and the wax gives the wood a nice feel and a sheen that can easily be restored by buffing with a soft cloth.
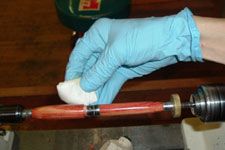
To apply CA glue, first put on
safety glasses
,
solvent-resistant gloves
and be sure to have adequate ventilation! The glue tends to give off searing, noxious ammonia-like fumes. It's a good idea to drape a rag or piece of newspaper on the bed of your lathe to catch any glue or finish that may drip down. With your lathe on the lowest speed, carefully apply a few drops of thin CA glue to the top of the wood and quickly run your gloved finger along the length of the underside of the blank to smooth it in a thin coat. Try to make just one pass, as the glue begins to set immediately and it's easy to mar the finish. Do not apply too much glue at once - it will simply sling off and splatter everywhere! It is much more effective to apply several thin coats than to try and apply one or two thick ones. Try to stay away from the very ends of the blanks so you don't get glue on the bushings. Repeat the process on the other blank, alternating back and forth between the pieces until you have applied the desired number of coats. I usually apply two or three. If the finish has bumps or ridges, you might find it helpful to sand lightly between coats until you get the hang of smoothing the glue.
Once the glue has completely dried, use
600-grit
(or finer) paper to smooth it out. I usually use progressively finer grits, ending at
1000 or 1500
. (A single sheet of 9" x 11" sandpaper lasts through quite a few pens if you cut it into strips.) If the finish has been applied unevenly or appears marred, you may have to use coarser paper and re-apply a coat or two of glue. Once your pen is smooth, you can apply polish or wax to achieve your desired sheen.
 Once your finish has dried completely, you are ready to assemble the pen. If you used CA glue, regardless of how careful you were, you may find that your wood pieces are stuck on the mandrel. Gently tap them to break the glue bond and carefully separate them from the bushings. Use a pen mill
by hand
to clean off any buildup from the ends. You can use a plastic squeeze-type bar clamp with the rubber pads removed, a vise with wooden jaws, or a pen press to assemble your pen. Again, do not use a metal clamp or vise with unlined metal jaws, as you will crimp or blemish the pen parts.
Once your finish has dried completely, you are ready to assemble the pen. If you used CA glue, regardless of how careful you were, you may find that your wood pieces are stuck on the mandrel. Gently tap them to break the glue bond and carefully separate them from the bushings. Use a pen mill
by hand
to clean off any buildup from the ends. You can use a plastic squeeze-type bar clamp with the rubber pads removed, a vise with wooden jaws, or a pen press to assemble your pen. Again, do not use a metal clamp or vise with unlined metal jaws, as you will crimp or blemish the pen parts.
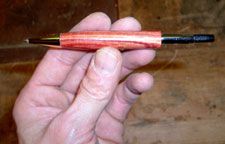 Be extra careful when inserting the barrel into the pen that you don't push it in too far. If you do, the pen will not retract completely. I generally press it in a bit at a time, checking it frequently by extending the tip. The tip should protrude far enough to write properly, but should retract fully.
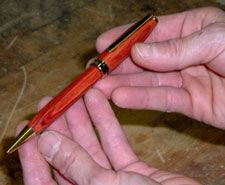 Assemble your pen completely, and that's it! You are now the proud owner of your very own custom-crafted pen. This year you won't have to worry about what you will give your friends and family as gifts, because everyone will want a pen! And once you get your fill of pens and pencils, there are bottle stoppers, magnifying glasses, yo-yos, screwdriver handles and other neat projects. Then, of course, there's bowls, candlesticks, vases...