|
|
The following article, detailing steps one
can take to improve table saw functionality, was submitted to us
by Richard McCandless of Akron, Ohio.
He writes:
"In the
last five years I’ve become more serious about my woodworking for
fun and in preparation for retirement. I started by taking a few
classes and replacing my ancient little table saw. I found myself
going out of my way to visit good sources, including Highland Hardware,
which is quite a hike from my home in Ohio. Now I’ve progressed
to Windsor chairs and another generation of bigger, sharper and
more powerful tools. The sense of fulfillment keeps growing."
Two Simple Table Saw Improvements
by Richard McCandless
Table saws are everywhere. Most of us start
woodworking with a table saw. Nevertheless, most of my homeowner
friends haven't made even the simplest improvements to their saws.
Nobody told them how.
Here are two simple steps you can take to improve your table saw.
They're virtually free. You can do them in minutes. Believe me,
they're worth it.
First, wax the table. If it's dirty or rusty clean it up with steel
wool or a
Scotch-Brite abrasive pad
(196203).
Then put on a coat or two of wax. You can buy dedicated products
for both cleaning and waxing, such as
Renaissance Wax
(195301), or I've
used car wax with good results. Avoid floor waxes which may contain
anti-slip ingredients - that would defeat the purpose. Spray-on
coatings such as
CRC Table Guard
(185121) and
Top-Cote
(085317) are also excellent
for reducing friction and preventing corrosion on cast-iron table
surfaces.
Your work will glide across the waxed surface. You'll be pleased
how much this improves your "saw experience." Like the first time
you used a really sharp tool, you'll think, "So
that's
how it's supposed to feel."
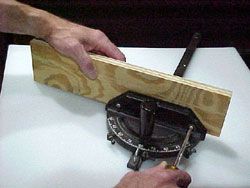
 Second,
add an auxiliary fence to your
miter gauge
. Cut a rectangular piece
of flat wood about an inch taller, and six to eight inches wider,
than the face of your miter gauge. 3/4" or 5/8" solid
wood, medium density fibre board (MDF) or plywood is fine. Screw
it to the miter gauge face from the back. I prefer that it just
clears the saw blade when the gauge is in use on the left side,
where I do most of my cutting. Screw holes to attach an auxiliary
fence are probably provided in your miter gauge already, because
manufacturers know this trick. Of course, be sure the screws don't
protrude through the new wooden face or they will dig into your
work.
Now try the gauge in its slots. When the miter gauge is in the right
hand slot the wooden auxiliary fence will probably overlap the blade.
But, you say, the saw blade will cut my new fence! That's right...this
is a sacrificial fence. Every so often you'll replace it. But once
again, you'll be pleased with the simple improvement. The bigger
fence keeps the work in place while you're cutting and gives you
more room to hold the workpiece against the miter gauge.
One more hint: by clamping a stop block to the auxiliary fence you
can speed the job of making duplicate cuts or cutting to an exact
size. If you like,
measuring tapes
and
stop block tracks
are available
to make an auxiliary fence more sophisticated. Even the simplest
version is a great leap forward, though.
These two quick steps will improve any table saw, big or little.
Once you try them they'll be a normal part of your woodworking.
|
|
