Here's My Woodworking!
by Stew Hagerty
Fort Wayne, IN
Click on any picture to see a larger version.
I am a former General Contractor in my 50's who always wanted to try his hand at woodworking but never had the time. Oh sure, during the course of my career I performed almost any construction related task you can think of including some really nice trim carpentry from time to time. I also made a few cabinets and constructed some built-ins here and there. But, I never really had the opportunity to do the kind of woodworking I longed to do. Then, four and a half years ago, I got sick. It was a particularly nasty, and still unidentified, bug that almost killed me on the spot; but I pulled through. While still recovering from being in bed for 3 months and starting to attend physical therapy, I began noticing that I felt dizzy and unstable in a way that didn't feel like it was just "deconditioning." Gradually, those symptoms worsened and I also started feeling weak on my right side. My doctor referred me to a neurologist who performed test after test without coming to any conclusion. He sent me to one big medical center after another, including Cleveland Clinic, Johns Hopkins, and finally the Mayo Clinic in MN. What the brilliant physician at Mayo finally diagnosed me with is something called Transverse Myelitis. It is a neurological disease that is a cousin to MS and causes lesions to form in the spinal column.
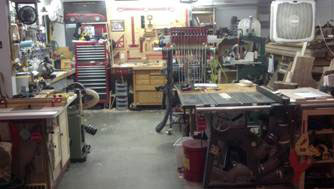
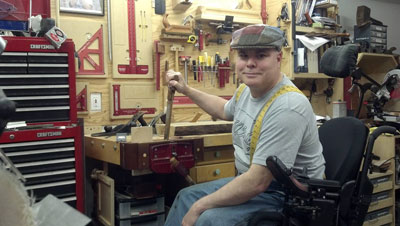
So now here I am, permanently disabled, unable to drive, and just hanging around the house all day in a wheelchair going stark raving NUTS! Until…I realized that I had lots of tools as well as space in my garage where I had always planned on building a workshop, and nothing but time on my hands. So, about two years ago, I started working on my wheelchair accessible workshop. It was slow work because I am only able to be up and around for short periods of time before I need to rest (although my strength and endurance have increased somewhat because of the physical therapy that creating and working in my shop has been for me). It took me several months to get my shop set up to the point where it was useable for what I wanted to do. Of course, nothing is ever set up perfectly the first time, and I continue to refine my shop as I use it.
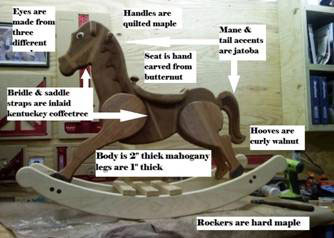
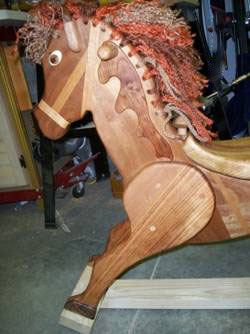
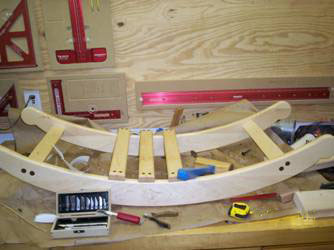
I made this rocking horse for my granddaughter's second Christmas. It is based off the "Family Traditions" plan with modifications of my own design. As I said, my limitations make me a slow worker. This horse took me about 3 months to complete. The photo above shows the variety of woods that were used in its construction. Notice in this photo that it is sitting there on my workbench "bald" prior to drilling all of the holes and weaving in the macramé mane and tail.
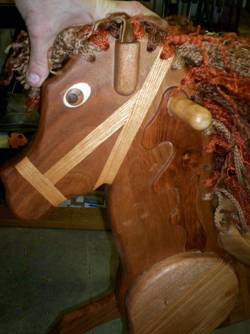
This photo gives a good view of the eye. I put a lot of thought into the construction of the eyes. First, I selected an oval that looked right, then I cut the ovals out of 1/8 inch thick holly. Second, I decided what size I wanted the iris to be and drilled an off-center hole of the appropriate size through the holly, which I then filled with a 3/16 inch thick circle of curupay, which is a beautiful milk chocolate brown with darker streaks. Third, I decided on the size of the pupil then drilled a hole in the curupay and filled it with a 1/4 inch thick piece of gaboon ebony. Finally, using a series of files followed by sandpaper, I rounded and blended the three different heights into a smoothly rounded eye. Also in this photo above you can see the bridle inlay, the mane accent, the leather ears, the quilted maple handles, as well as the series of weaving holes and macramé.
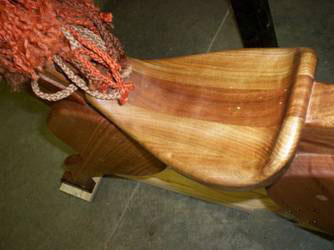
Above is a good shot of the seat. I sized and roughed out the shape for each side with 3D cuts on the bandsaw. Next, I positioned one side against the body and drilled dowel locations through the body into the seat half. Then I removed the first side and clamped the other side in place and using the holes I just drilled and bored the other halves of the dowel holes into this seat half. Then the dowels were placed through the body and each side glued over them. Once everything was good and dry I started carving, using a combination of chisels, rasps, and files to shape it into a comfortable saddle.
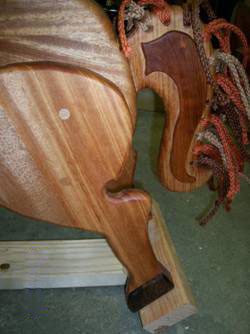
This photo above shows the jatoba tail accent as well as the weaving hole layout.

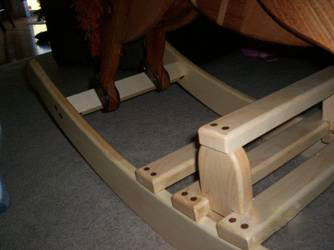
Above you can see part of the brace I had to make in order to support the legs during shipping. Once completed, I had to ship the horse and the rockers in separate boxes from Indiana out to Denver where our son, daughter-in-law, and granddaughter live. We could have bought it a seat on the plane with us for the cost of shipping.

Above is a front view with a better look at the 2x4 shipping brace. The outer hoofs are glued in place, while the inside hoof pieces are screwed on and conceal the cross dowels that are used to attach the rockers.
Here are the rockers ready to be packaged for shipment. All the cross braces and platform pieces are glued and screwed in place. For contrast I used jatoba plugs.
The above view shows the removable riser block. As her legs get longer, the riser can be removed and she can rest her feet directly on the platform.

Above is the completed horse. This shot is taken after I reassembled the horse with its rockers out in Denver. Before shipping and before the macramé, I sanded everything to 220 grit then finished the horse using my own version of the old BLO, Wax, and Turpentine finish. I made it by warming 1 part odorless mineral spirits and gradually adding 3/4 part beeswax shavings and 1/4 part carnauba wax shavings until they were completely dissolved. The carnauba wax makes the mix seize very easily, so I slowly added 1 part boiled linseed oil. The odorless mineral spirits make for a mixture that pretty much just smells like wax, while the carnauba addition makes this a much harder coating. I rubbed in a nice thick coat (the mixture melts with the warmth of your hand) that really soaked into the grain, and let it dry over night. In the morning I pulled out my waxing brushes. I have a hand held model as well as one that chucks up in a drill. Using one and/or the other I worked and worked over the whole horse and rockers. The brushes, especially the electric one, really warm up the wax and work it right down into the wood. The final product has that beautiful traditional hand-rubbed look and a finish that can easily be repaired as it gains nicks, knocks, and bumps over years of happy childhood laughter.
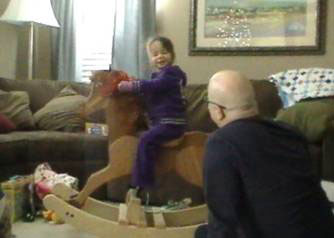
We celebrated our Christmas with them the next morning. This is what makes it all worthwhile.
Since this project, I have continued to work in my shop as much as my health will allow. I've enjoyed delving deeper and deeper into woodworking in general, and hand tool woodworking in particular. I love the feel of working a piece of wood with a well tuned hand plane. I have amassed a fair sized collection of vintage planes and saws, and I have learned how to sharpen both. Among the projects I have made since the Rocking Horse include: a Mantle Clock for my son & daughter-in-law, a three tiered Basket Stand for my wife, and I just completed a Chest for my daughter.
When I'm out in my shop, with my tools and wood, I feel centered. It gives me a peace in my soul and a positive outlook in my mind. Now that I have woodworking, I have a future that I can look forward to. It's absolutely the best medicine that I take to treat my illness.
You can email Stew at
kilted-carpenter@comcast.net
or take a look at his Facebook page with more pictures at
http://facebook.com/stew.hagerty
.
Would you like to see your woodworking in this column? We invite you to
SEND US PHOTOS
of your favorite woodworking projects along with captions and a brief history of your woodworking.
(Email photos at 800x600 resolution.) Receive a $50 store gift card if we show your stuff in a future issue.
Return to
Wood News
front page