
 by Steven D. Johnson
Racine, Wisconsin
(Page 2 of 3)
Previous Page
1
2
3
Next Page
Predicting Wood Movement… An Observational Method
Click on any picture to see a larger version.
As a refresher, it might be helpful to go back and re–read the
"Wood Movement" article from the June issue of Wood News Online
. Wood will move over time and in response to environmental conditions, and while it may not always be possible to predict the movement with absolute certainty, there are some indicators we can utilize.
The wood we mostly work with today is not as good as the wood used by craftspeople fifty, seventy–five, or a hundred years ago. Some of the decline in wood quality is due to the relative youth of trees harvested today, but much of it has to do with our current methods of sawing the wood and our current definition of "waste" and the best ways to minimize it.
The other important lesson from the June article is that with the inevitability of wood movement, not every piece of furniture, or even every furniture part, will stay straight and true for decades or more. The furniture that stays straight and true will survive, be passed on from generation to generation, and will give future owners the impression that the piece was spectacularly constructed… simply because it survived. So if a piece of furniture or a furniture part warps or twists, and your construction techniques were sound, don't beat yourself up too much. Just replace the part or the entire piece, and future generations will never know that anything you ever built was less than perfect.
|
|
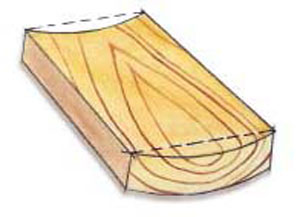
Figure 4 – "Cup"
|
There are numerous ways to predict wood movement, each with varying degrees of potential success. Charts abound on the internet that can give insight into the amount a particular species of wood will shrink or expand.
|
|
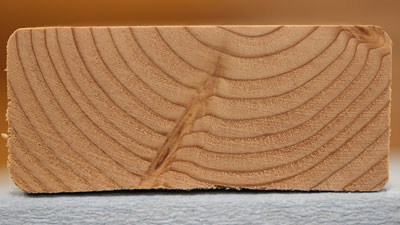
Figure 5 – Note this board is cupping toward the bark side
|
Dried lumber will tend to "cup" forming a concavity opposite the "bark side" of a flat–sawn board. But even that golden rule is not always true, for sometimes the "cup" will form on the bark side (see Figure 5). This is particularly important to contemplate when assessing wood. Construction grade lumber will not typically be dried to the same level as hardwood species and will virtually always cup toward the bark side. Kiln dried hardwoods will often be dried to a point below that of the average relative humidity in the environment in which the wood will be used, thus will absorb moisture and cup toward the side opposite the bark.
|
|
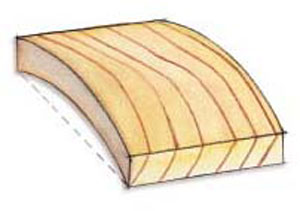
Figure 6 – "Kink" or "Crook"
|
Grain that runs generally from one corner of a board toward the opposite corner, or in other words, not perfectly parallel to the length of the board, will likely develop a "kink" or "crook." This is more noticeable in "juvenile" lumber and lumber sawn from a spot closer to the center of the tree and is particularly prevalent in so–called quarter–sawn lumber.
|
|
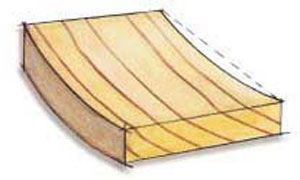
Figure 7 – "Bow"
|
|
|
Figure 8 – "Twist"
|
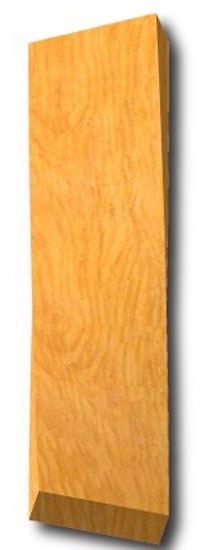
Flat–sawn boards, particularly those exhibiting cathedral–shaped grain patterns on the face are more likely to develop a "bow." This is particularly prevalent when the board is taken from sections of the tree where the size is transitioning rapidly (this happens quite often in younger, shorter trees). The "bow" is caused by differential swelling and contracting between the two faces of the board.
We all try to spot these various grain patterns when shopping for wood, but the fact is, if our standards are too stringent these days, we may well come home empty–handed. I have spent hours combing through stacks of supposedly better quality (higher priced) lumber and still managed to acquire some disappointing boards. Lately I have been purchasing number 2 common rough sawn boards. I give them a cursory look to make sure there are no egregious cracks, knots or cup or crook and quickly make a "buy" or "no buy" decision. It seems I wind up with essentially the same amount of usable wood, often in significantly less shopping time and at less cost (however, a sound case can be made that the time I save in shopping is offset by the time I spend milling the lumber).
|
|
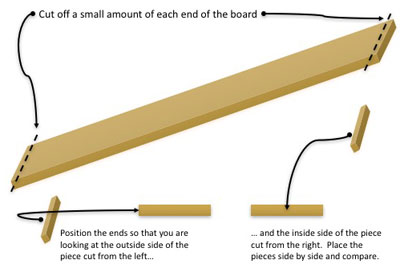
Figure 9 – It takes only a few seconds to cut a small section from either end of the board
|
After the initial milling steps, when I can clearly see the board and its color and grain pattern, I make an assessment of wood movement that has proven to be invaluable. It only takes a few minutes and what I learn helps determine where and how certain boards will be used in projects. It is very easy to do.
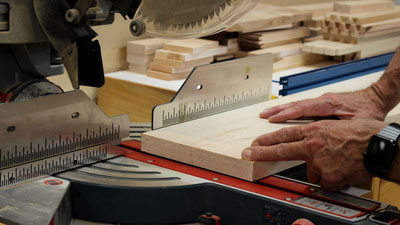
First, make a clean straight trimming cut on the left–hand end of a board. This is particularly important with rough–sawn lumber. The end grain is often obscured by age, end grain sealant, or is simply too roughly cut to get a good look at the grain.
|
|
Figure 10 – Make a trimming cut first so that the grain is visible...
|
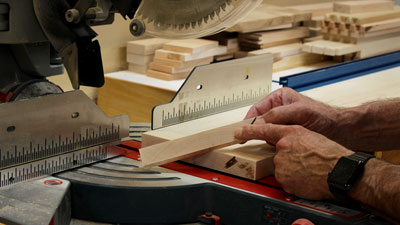
After the trimming cut, cut another quarter–inch or so off the board. Label the left (outside) face of that cut–off as "left end" and set it aside. Now cut off a quarter inch or so of the right–hand end of the board. In this instance there is no need to first make a trimming cut, since we will be looking at the just–cut face. Label the left hand face of this cut–off "right." If that explanation sounds confusing,
the graphic in Figure 9
explains the simple procedure.
|
Figure 11 – ...then cut off a quarter–inch piece. Label this "left"
and try not to get burn marks like I did!
|
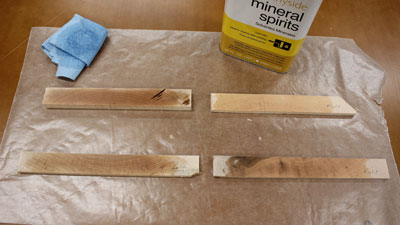
Now lay the two cut end pieces side–by–side and study the grain. I find that on some woods, like the light–colored maple in these photos, it is helpful to wipe on a little mineral spirits to pop the grain out a bit.
|
|
Figure 12 – Prep the samples by using mineral spirits to "pop" the grain
|
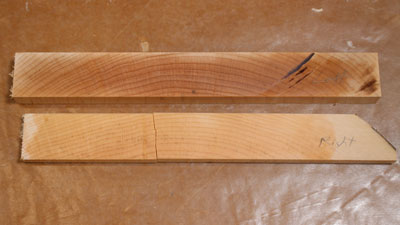
Figure 13 below (clicking on the photo will enlarge it) shows samples from a board that is 62 inches in length. As you can see, while there is some variation in color (denoting the proximity to the heart of the tree) there is little variation in the grain pattern from one end of the board to the other. While this board might exhibit some minor degree of cupping, it is unlikely to twist or bow over time. Note that the growth ring spacing is fairly uniform between ends and the shape of the curves is almost identical.
|
Figure 13 – Place the two pieces side by side and you can "read" the difference
in grain pattern from one end of the board to the other
|
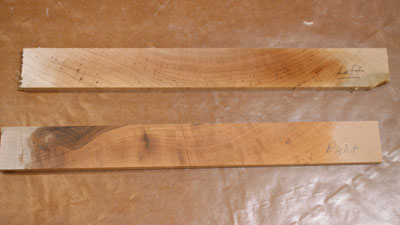
Conversely, the samples shown below in Figure 14 exhibit what I euphemistically refer to "squirrely" grain. There is just no telling what will happen to this board over time. It is a prime candidate to develop twist. Note the difference in the grain between ends, particularly on the left hand half of the samples. Probably the best option here is to rip this board in half and use the right–hand side.
|
Figure 14 – Look closely at the grain in these two samples and you might think
they didn't even come from the same board... they did!
|
Every board is different… that, of course, is part of the beauty, charm, and challenge of our craft. It would be impossible to make samples and demonstrate every conceivable scenario, but if you perform this simple procedure with every board you contemplate using in your next project, you will learn a lot. Soon you will be able to pick and choose the best boards for the best spots with a fairly high degree of confidence.
(Page 2 of 3)
Previous Page
1
2
3
Next Page
Return to
Wood News
front page
